Showing posts with label Changing. Show all posts

Friday, 2 September 2011

Changing the Userid When Triggering the Subscription PeopleCode

The IntBroker(IB) Class method: SwitchAsyncEventUserContext can be used to change the context of the peoplecode running inside the subscription peoplecode. This has to be used by IB only (Checks are available to validate it) and can only be used for IB events that are fired asynchronously (OnRoute, OnSend, OnNotification, etc.). One use case would be, if someone is submitting a process request from a self-service user id and they do not want to give access to query security to each users who are triggering the message. This method is added in PT 8.50 and is not available for lower tools release.


For more information use: E-IB: User Security required on target db for asynchronous messages in 8.48.0x [ID 654592.1]


PeopleBook definition for this method is as follows:


SwitchAsyncEventUserContext


Syntax
SwitchAsyncEventUserContext(UserID, LanguageCode)
Description
Use the SwitchAsyncEventUserContext method to switch the user context within an Integration Broker asynchronous event
Parameters
UserID
Specify the user ID as a string, to which the context has to be  switched.
LanguageCode
Specify the language code, as a string for the user ID
Returns
A Boolean value: true if the switch user was successful, false otherwise.
Example
&returnValue = %IntBroker.SwitchAsyncEventUserContext(“VP1?, “ENG”);


Wednesday, 31 August 2011

Changing the Favicon in PeopleSoft – The “How to”


Last week I posted a blog entry highlighting why I think adding a favicon to PeopleSoft can be a helpful visual aid for your users.  This post walks through how I did it – note: I’ve only tested this in Tools 8.50.


It’s probably a good idea to have one for each environment excluding Production that shows the environment name, and then have Production as the corporate logo (or your PeopleSoft system logo etc).  I created my 32×32 pixel images in GIMP as it can save as a .ico file, but any graphics package will do (as will this online ico creator).  I didn’t experiment with other sizes or file formats, let me know if you do and I’ll update the post.


Upload your icons as images in App Designer.


We need to create a function to provide the correct image for each environment as we’ll be calling this from more than one place.  I added my function to WEBLIB_PT_NAV.ISCRIPT1 as we’ll be customising it later anyway.

Function GetFavicon() Returns string Local string &Favicon; Evaluate %DbName When = "DEV" &Favicon = %Response.GetImageURL(Image.<>); Break; When = "TST" &Favicon = %Response.GetImageURL(Image.<>); Break; ...etc... End-Evaluate; &Favicon = ""; Return &Favicon;End-Function;

You need to amend both PT_HNAV_TEMPLATE and PT_IFRAME_HDR_SWAN HTML templates so that the code for the Favicon can be passed in.


Amend PT_HNAV_TEMPLATE thus (I’m just showing the top 6 lines – lines 4 and 5 are the ones I’ve added):

%bind(:23)
...

Amend PT_IFRAME_HDR_SWAN thus (I’m just showing the top 5 lines – lines 3 and 4 are the ones I’ve added):

%bind(:25)...

Note: Your bind numbers may vary. You can check they’re correct when we get to the calling functions shortly.


The final step is to amend the PeopleCode so that the string provided by our GetFavicon function is passed into our HTML definitions.  Open PT_BRANDING.BrandingBase.  Scroll down to where the delivered code is declaring functions (it’s around line 155 for me) and declare the function that you created in Step 2.


Next, find method ‘getIframeHeaderHTML’ and scroll down to near the bottom.  You’ll see a call to one of the HTML objects that you just amended ‘PT_IFRAME_HDR_SWAN’.  Add your function as a parameter to the end thus:

&hdrHTML = GetHTMLText(HTML.PT_IFRAME_HDR_SWAN, &charSet, ... , &hoverNavLoc, GetFavicon());

As a double-check, you should also make sure that it’s the same number parameter as the bind variable that you added in the previous step.


You’ll need to make a similar change for the other HTML template.  Open WEBLIB_PT_NAV.ISCRIPT1.FieldFormula and search for the function ‘buildIframeTemplate’.  Again, scroll down to the end of the function and add your function as a parameter to the end:

Return GetHTMLText(@("HTML." | &templateHTMLObjName), &charSet, &requiredToolsSS, ... , &ptcxmCollapseImgURL, GetFavicon());

Again, make sure that the parameter number matches the bind number in the HTML file (PT_HNAV_TEMPLATE) earlier.


You should be able to sign in and see the results immediately.  Good luck and let me know how you get on!

Be the first to like this post.

Changing the Favicon in PeopleSoft


A Favicon (short for favorites icon, also known as a shortcut icon, website icon, URL icon, or bookmark icon) is a small logo that appears next to the website URL in the browser address bar.  This website has the favicon from WordPress, as that’s the blogging platform that I use.


Although adding a favicon made the web surfing experience marginally more attractive (the favicon also appears in your bookmarks/favourites menu to make it easier to identify each website, for example) it was pretty unimportant to us in the PeopleSoft world.  Now that tabbed browsers are starting to proliferate into company workstation rollouts the favicon is starting to become more useful.


As an example, can you identify these 9 favicons from my open browser tabs (I’ve redacted the text from a couple as they’re pretty easy):


I’m quite a fan of finding methods to make it easy to differentiate your PeopleSoft environments.  I think it’s a useful productivity tweak to be able to instantly know whether you’re in DEV, TST or PRD without having to check the address bar and parse through the URL (for less technical business users especially).


Wouldn’t it be useful to have a different Favicon for each environment?  That way you can easily tell which tab you need.  When you’re trying to find a specific environment that you’ve logged into, how useful is it to go from this:


to this:


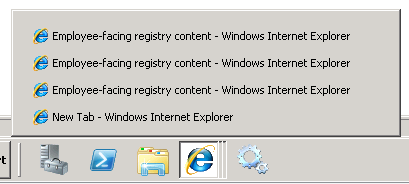
And with grouped taskbar buttons being the default in recent versions of Windows, it’s also handy to go from this:


to this:


So how is it done?


It’s not a big customisation, although it does obviously touch a couple of Tools objects.  I’ve written it up here.

Be the first to like this post.